Download and Installation
Running MicroGridsPy requires:
Install and use Anaconda (or Miniconda)
Install and set up the environment for MicroGridsPy
Install a Solver among the supported ones (Gurobi - license required, GLPK - free to access)
Download and Launch MicroGridsPy with Graphical User Interface (GUI)
Warning
The installation steps following refer to Windows. The environment for macOS (version 2.1) of MicroGridsPy is currently under development and not available. We advise macOS or Linux users to rely on MicroGridsPy version 2.0 until the new environment is fully developed and released.
1 - Install Anaconda (or Miniconda)
Anaconda’s package manager, known as conda, is a powerful tool for managing packages, dependencies, and environments in the Anaconda ecosystem. It is designed to handle various types of packages, including Python and R, and works across multiple platforms (Windows, macOS, and Linux). Here are key features and functions of conda:
Package Management: conda allows users to install, update, and remove packages. It hosts a large repository of scientific packages and ensures that the installed packages are compatible with each other.
Environment Management: One of the most significant features of conda is its ability to create isolated environments. These environments can have different versions of Python and packages, making it easier to manage dependencies for different projects without conflicts.
Cross-Platform Compatibility: conda works on various operating systems, providing a consistent experience across platforms.
Large Repository: Anaconda comes with a vast repository of pre-built packages specifically tailored for scientific computing, data science, and machine learning applications. This saves time and effort in compiling and configuring these complex packages.
Open Source and Community-Driven: conda is open-source and benefits from community contributions, which means a wide range of packages and continuous updates.
Ease of Use: While it offers a command-line interface, conda is designed to be user-friendly, making package and environment management accessible to users regardless of their expertise in command-line tools.
To install Conda:
Download and install the Anaconda distribution that includes support for Python 3, ensuring compatibility with MicroGridsPy. You can find also a complete list of installation files and old versions here .
Follow the installation instructions provided for your specific operating system.
Note
Review the system requirements before installing Anaconda Distribution. If you want a more lightweight installation, you can opt for Miniconda, which includes only conda and Python, allowing you to install additional packages as needed. For the scope of using and running MicroGridsPy Miniconda is sufficient and recommended if you have limited disk space or want more control over the packages installed on your system.
Getting started with conda using the Anaconda Prompt
Conda is a powerful package manager and environment manager that you use with command line commands at the Anaconda Prompt for Windows, or in a terminal window for macOS or Linux.
Windows:
From the Start menu, search for and open “Anaconda Prompt”. The Anaconda Prompt is a command-line interface tool that comes with Anaconda. It is particularly tailored for managing Python environments and packages within the Anaconda ecosystem and it enables users to execute Python scripts, install new packages via conda (Anaconda’s package manager), create isolated environments to avoid dependency conflicts, and update the Anaconda distribution itself. On Windows, all commands below are typed into the Anaconda Prompt window.
MacOS:
Open Launchpad, then click the terminal icon. On macOS, all commands below are typed into the terminal window.
Linux:
Open a terminal window. On Linux, all commands below are typed into the terminal window.
Manage conda
Verify that conda is installed and running on your system by typing:
conda --version
Conda displays the number of the version that you have installed. You do not need to navigate to the Anaconda directory.
Note
If you get an error message, make sure you closed and re-opened the terminal window after installing, or do it now. Then verify that you are logged into the same user account that you used to install Anaconda or Miniconda.
Update conda to the current version. Type the following:
conda update conda
Conda compares versions and then displays what is available to install. If a newer version of conda is available, type y to update.
Note
We recommend that you always keep conda updated to the latest version.
2 - Install MicroGridsPy Environment
In conda, an environment is an isolated space that allows users to maintain different versions of Python and various packages without interference. Each environment can have its own specific set of packages and Python versions, independent of others. This is particularly useful in managing dependencies and avoiding conflicts when working on multiple projects with differing requirements. By using environments, developers and data scientists can ensure consistency and reproducibility of their work across various setups and collaborations.
Create the Environment from Anaconda Prompt
When you begin using conda, you already have a default environment named base. To create a modelling environment that already contains everything needed to run MicrogridsPy, download the environment YML file named mgpy_win.yml from the following GitHub repository:
https://github.com/SESAM-Polimi/MicroGridsPy-SESAM/blob/Environments/mgpy_win.yml
Follow these steps to create the environment:
Place the YML file (mgpy_win.yml) in
C:/Users/youruser.Open the Anaconda Prompt.
Type the following command in the Anaconda Prompt terminal:
conda env create -f mgpy_win.yml
Activate the environment by:
conda activate mgpy
Note
conda activate only works on conda 4.6 and later versions.
3 - Install a Solver
Gurobi:
Gurobi is a leading mathematical optimization solver renowned for its efficiency in solving linear, mixed-integer, and quadratic programming problems. Gurobi stands out for its high-performance capabilities, user-friendly interfaces compatible with multiple programming languages, and continuous updates incorporating the latest algorithmic advancements. While it offers free academic licenses, its commercial use is governed by a comprehensive licensing model, making it an essential tool for researchers and professionals alike in optimizing complex decision-making processes. More info at Gurobi documentation
GLPK:
GLPK is an open-source solver for Linear Programming (LP) and Mixed Integer Programming (MIP). It’s a suitable option for smaller to medium-sized problems and offers a free alternative to commercial solvers.
Warning
While GLPK is a capable solver for many optimization problems, it may have longer operational times compared to commercial solvers like Gurobi, especially for large or complex problems. The difference can often be substantial, potentially ranging from several times to orders of magnitude faster, depending on the specifics of the problem even if it’s important to note that these are general observations, and actual performance will vary with each unique problem. It is advisable to consider this factor when choosing a solver for time-sensitive or large-scale applications.
Refer to (Example Gallery) for more details about the specific performances of the two solvers compared for a test model simulation.
HiGHS:
HiGHS is high-performance serial and parallel software for solving large-scale sparse linear programming (LP), mixed-integer programming (MIP) and quadratic programming (QP) models, developed in C++11, with interfaces to C, C#, FORTRAN, Julia and Python. HiGHS is freely available under the MIT licence and is downloaded from Github. Installing HiGHS from source code requires CMake minimum version 3.15, but no other third-party utilities. HiGHS can be used as a stand-alone executable on Windows, Linux and MacOS. There is a C++11 library which can be used within a C++ project or, via one of the interfaces, to a project written in other languages.
Warning
The HiGHS solver integration is currently under active development and will be available soon. This feature is being tested and optimized to ensure seamless performance with MicroGridsPy.
More info at HiGHS documentation
Obtain a Gurobi License
Before installing Gurobi, you need to obtain a license. Gurobi offers different types of licenses, including academic licenses which are free for academic purposes. Visit the Gurobi website and register for a license, then follow their instructions to set up your license: Gurobi website
Installing Gurobi using Anaconda Prompt
Open the Anaconda Prompt (or your terminal in Linux/Mac).
Activate the mgpy environment.
conda activate mgpy
Install the Gurobi package by running:
conda install -c gurobi gurobi
Once Gurobi is installed, you need to activate your license. This usually involves running a command provided by Gurobi in your Anaconda Prompt or terminal. If you’re using an academic license, you typically run:
grbgetkey YOUR_LICENSE_KEYRefer to the Gurobi website for more information about license installation.
Installing GLPK using Anaconda Prompt
If you are using Anaconda, GLPK can be installed easily using the Conda package manager. To install GLPK, open your Anaconda Prompt or terminal and enter the following command:
conda install -c conda-forge glpk
This command installs GLPK and ensures that it is added to your environment’s path, allowing Pyomo to automatically detect and use it.
4 - Download and Launch MicroGridsPy with GUI
Download the MicroGridsPy Folder
To actually use MicroGridsPy, first download the folder of the model from GitHub. Open your web browser and go to the SESAM GitHub repository at this link:
SESAM-Polimi/MicroGridsPy-SESAM: MicroGridsPy - SESAM-PoliMi (github.com)
Click the green “Code” button on the right side and select “Download ZIP” to download the entire folder as a ZIP file. Unzip and place the folder wherever it’s easily accessible in your system.

Launch Spyder using Anaconda Prompt
Spyder is an open-source integrated development environment (IDE) primarily designed for scientific and data-driven computing in the Python programming language. It provides a user-friendly and interactive environment for tasks such as data analysis, scientific research, machine learning, and numerical computing. Spyder offers features like a code editor, IPython console integration, variable explorer, and a comprehensive set of tools for data visualization and exploration, making it a popular choice among data scientists and researchers for Python-based projects.
Note
If you prefer to use another IDE, such as Visual Studio Code, ensure it is installed on your system. You can start Visual Studio Code by opening the application normally and ensuring the correct Python interpreter from the mgpy environment is selected. Make sure to configure Visual Studio Code to use the Python interpreter from the activated mgpy environment by selecting it from the interpreter options in the bottom bar or via the command palette.
To launch Spyder using the Anaconda Prompt, follow these steps:
Open the Anaconda Prompt.
Activate the mgpy environment:
conda activate mgpy
Type the following command to open the Spyder interface:
spyder
Launch the GUI within Spyder
After launching the Spyder IDE, you should see the following page:

If you have visualization problems, you can always set the default layout from the “View” button.
Locate the MicroGridsPy Working Folder: In Spyder, go to the “File” menu at the top left corner of the interface. Select “Open…” to open a file or folder.
Navigate to the MicroGridsPy Folder: Use the file browser to navigate to the location where you have the MicroGridsPy project folder stored on your computer.
Open the MicroGridsPy Folder: Double-click on the MicroGridsPy project folder to open it within the Spyder interface. You should now see the contents of the project folder displayed in the Spyder File Explorer.
Locate `app_main.py`: In the File Explorer panel on the left-hand side of the Spyder interface, navigate to the “Code/User Interface” folder within the MicroGridsPy project folder. Look for the app_main.py file within this folder.
Open `app_main.py`: Double-click on the app_main.py file to open it in the Spyder code editor.
Run `app_main.py`: With app_main.py open in the code editor, you can run it by pressing F5 or using the “Run” button in Spyder’s toolbar. Alternatively, you can right-click in the code editor and select “Run File” from the context menu.

After running app_main.py, the interface of MicroGridsPy should launch within Spyder.
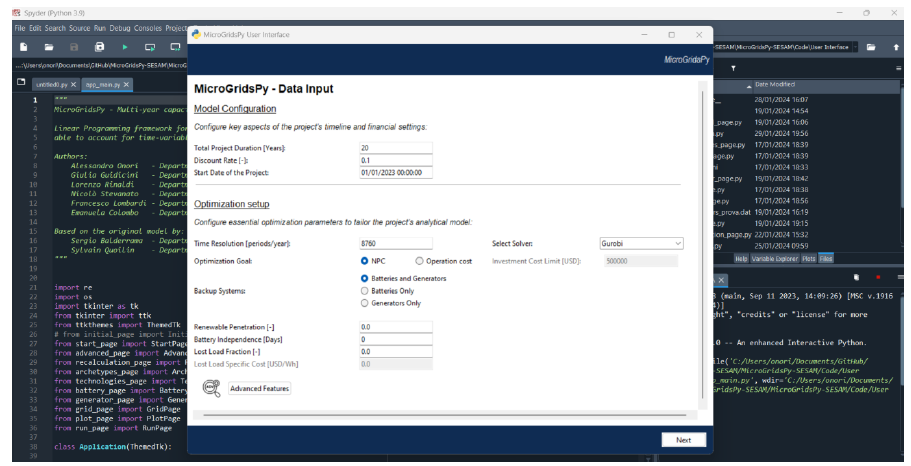
Well done: you can now interact with the application as needed for your specific use case!